

Marcel, I am proud to say, is done. This is a bike that has been years and years and years in the making. It started out as a custom frame order from Velo Orange, back when they offered custom frames. I bought all the parts I needed; and all these parts stayed in my closet after they cancelled their custom frame line. This was the frame I originally wanted to build in Doug Fattic's class, though he quickly convinced me that it was way too complicated for a first frame. Then, since I wasn't having any luck finding a space to build, I decided to order a version of this frame from someone else. This was the bike to be named "Clive" (you can find out more by searching that keyword), but it didn't work out, and it was back to the drawing board.
Naturally, when I finally got a space to build, this was the bike I started to make. I made the fork (the fork that's now on this bike), but then messed up the BB drop on the frame, so had to turn that frame into Jocelyn Lovell Bike. I had already started the Curnoe bike at that point, so the randonneur moved to #3 on the self-made queue. But then I got busy, and I lost my shop space, and #3 never happened.
Enter Olivier. After we lost our space, he set up a little framebuilding area in his house. So I asked him if he could finish what so many other had started. This he did (in something like two weeks, no less.) Using my fork, and some "investment stamped" lugs I'd made, and some other frame bits such as my CS/dropouts, he put this together, and build a rack, stem, and décaleur for me. I then filed the lugs and did various picky things I like to do. Then Noah Rosen (Velocolour) did the paint and chroming. The result is Marcel, an uncommonly fine bicycle.

This was by far the longest, most complicated build I've ever done. Since time is at a premium these days, I decided not to bother documenting it, and just get it done.
One of the main complicating factors was my lack of shop space. I just clamped my vise to my desk and went for it.

The below picture captures the experience. It's a total mess, there are bike tools, files, drills, and soldering stuff all over the place. It took me about a full week of work to get all this done, then a full day to clean up.

The results.
Of course, it was worth it. I guess I still prefer the Curnoe Bike, just for being so colourful and weird, but this is probably a "better bike." It's a fairly extreme version of a constructer bike—extremely integrated—and it all works phenomenally well, so far.
Here he is: Marcel.

The logo.
Since I didn't make all of this bike myself, it of course didn't make sense to use my A.HAMMOND decals. But given my obsession with decals, obviously I wasn't going to leave it blank. After much thought, I came up with the name BIS, and this logo:


The name is mainly from the musical term, "bis," meaning repeat. Repetition is the basic activity not only in cycling (turning the pedals over, again and again and again), but also in frame building, where you seem to always do something at least twice before you get it right. A lot of French product names have the word "bis" where an English product would be "mark II"—the second try, the improved version. That sense of the ongoing, never-ending quest for perfection (hey, didn't Richard Sachs say something about that somewehere?) is part of the name too.

More important, though, is the root word of bis: two. It's a bike made by two people, the result of collaboration at every stage. I hate to get too mushy/conceptual here, but that's why the two sides of the downtube logo share a letter "I." Two "I"s merge into one. Collaboration! (Noah, if you're reading this, yes, my tongue is in my cheek—slightly.)

If ever a logo called for a second version, though, a "mark II," this is probably it. People seem to think it says either "B.S." (woops) or "B.L.S." or something. Pretty much no one gets "BIS." In a way, though, even that misreading sort of fits in to the concept.

The head tube/seat tube logo is that stretched out letter "I" surrounded by two dots, the musical notation for a repeated passage—for "bis." You'll notice that you see the same shape when you look at the downtube logo (above) from the top.

I really like the way the DT/ST logos look, and wouldn't change them. I also love that photo above and this one below. The above for its symmetry, and the shifters popping up like ears, the below for getting so much action into a small frame.

By the way, the name "Marcel" is from Marcel Proust, one of my favourite writers. I was briefly considering calling my collaboration with Olivier "Cycles Proust," because one of his surnames is Proulx, which is related to Proust, and since I like Proust so much. Also because the title of Proust's great work, À la recherche du temps perdu, "In Search of Lost Time," is a pretty appropriate slogan for a bike company. But, alas, it was all too cheesy, even for me, and so BIS was it, with Marcel left for the name of the bike.
Stem, décaleur, general integrated-ness.
As a bike, probably the most distinctive thing about Marcel is his (yes, typically French) integration and constructer-ness. A lot of that is visible in Olivier's custom-made stem, which holds a décaleur, a special hanger, a boss for a bell, and a step cap switch for the lighting system.

There it is from the other side. Note also that beautiful headset spacer, made from aluminum tubing of the same dimension as the steel used to make the stem clamp.


Handlebars.
The handlebar area is really pretty exciting on Marcel. The levers are nice Mavic-branded Modolos.

The bars themselves are Philippe randonneur bars. I've never seen any other black ones like these; they're pretty phenomenal. I really like the colour of the cloth bar tape too. That's white tape with about 15 coats of clear shellac, then two coats of amber, then some more coats of clear. I was trying to get it to match the sidewalls of the tires and the chamfer colour on the Brooks Pro saddle. (I can't help mentioning the nice radius on the stem clamp—one of the little touches I'm responsible on an otherwise made-by-Olivier stem. Note that the clamp itself is 25.0, for the French bars.)

Rack
The rack is entirely Olivier's doing and must be one of the nicest ever made.

It's an absolutely minimalist design, and does the job very well.

Probably the nicest touch is that gracefully bent tube that serves both as a left strut and a light mount. Best of all, Olivier left the tube open to make it easy to pass lighting wires through. A really brilliant touch, and very helpful in the build process, which was complicated enough as it was.

Back end of bike.
Let us now, totally arbitrarily, have a look at the back end of the bike. That's a Brooks Pro saddle, a Sugino Mighty seatpost (horrible looking when I got it, but some filing/sanding/polishing got it back in order), a really quite nicely filed Cinelli CS seatlug, a beautiful rear brake cable hanger, and, well other things I can tell you more about below.

As I did on the Greg Curnoe Bike, I made a fender reinforcer for this one. I actually meant to have have the two bolts on the other side of the stay, but I don't imagine there's any functional difference. It looks fine, too.
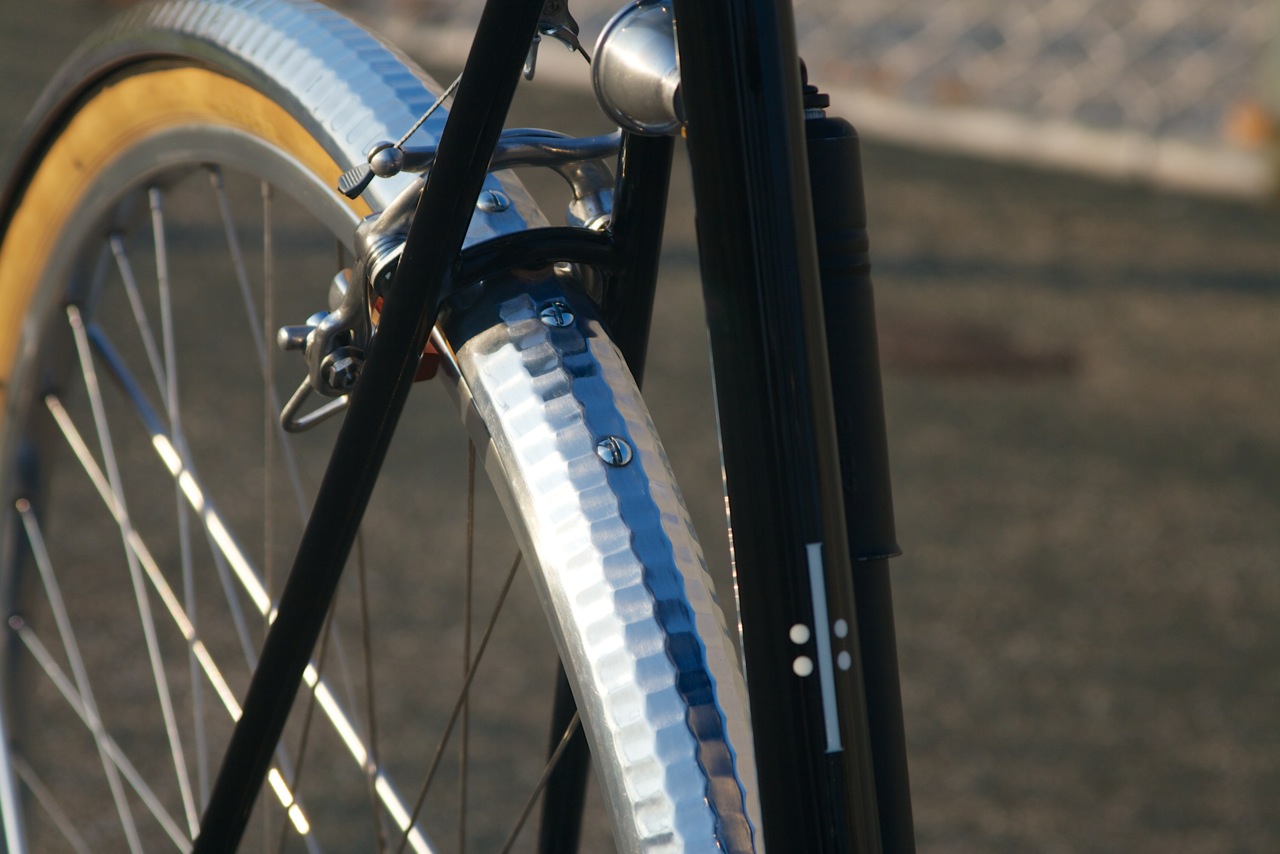
Man oh man oh man oh man do I like this Mavic derailleur. It works as well as the 7400 Dura Ace, but it's built with that Mavic over-the-topness, and it looks amazing. I took advantage of the fact that one can totally take these apart and rebuild them (no rivets!) to disassemble it and remove the anodizing. Thus all the shine. This is a NOS derailleur, being used for the first time now. The cassette is a 13-24 Shimano Uniglide 6-speed that I found (along with a bunch of others; I have a massive stash now) a couple of years ago, unused, at a bike co-op. The hub is a XT 6-speed Uniglide mountain bike hub, spaced at 130mm. A really excellent hub. Also, note the cut-out Ritchey dropouts. Filing that shape out was the very first thing I did in my the shop behind Hoopdriver.

Olivier added this chain slapguard, made from a spoke. I got the idea from something I saw by Alex Singer.

The rear light/pump peg/etc.
I got these lovely engraved Mafac "2000" calipers from Mike Barry, probably in about 2006. I stripped the anodizing, leaving them in this beautiful state. Mounted to braze-ons, of course.

There's that nicely filed seat lug again. And more excitingly, the rear light. The shell was taken from an old French taillight Olivier found for me on French eBay, and Olivier and I made the actual light and figured out a way to attach it to the frame. (It's all done through chainring bolts, convenient since they're hollow, and you can pass wires through them.) This is one of the nicest shots, showing lots and lots of little things going on, and working well.

From the other side, you can see the pump peg. Also, the light nicely lit up by the sun...

The stem cap switch.
The biggest source of stress for me was figuring how to make this stem cap switch work. It's a pretty simple idea (it makes a lot of sense to be able to turn your light on and off from there, especially since that's a spot that's not used for anything else), but really quite complicated to implement. I got the idea from Jan Heine, but unlike him I wanted to use a threadless steerer, just to make things slightly less complex. The downside to my arrangement is that I can't adjust the headset without taking the switch out, so it needs to be set up perfectly the first time. (Naturally, I've already had to take it apart a few times.) Olivier made the beautiful cap itself. I did all the wiring, which required a lot of forethought, but wasn't really all that tough. One of my favourite things about this bike is that the lighting circuit is grounded through the frame—the steel is actually part of the circuit—the frame is alive with electricity!

Without going into all sorts of detail, this is the switch and the little machined plastic piece that keeps it in place. (It all needs to be knocked a few centimeters into the steerer, so that the switch stem sticks out only slightly.)
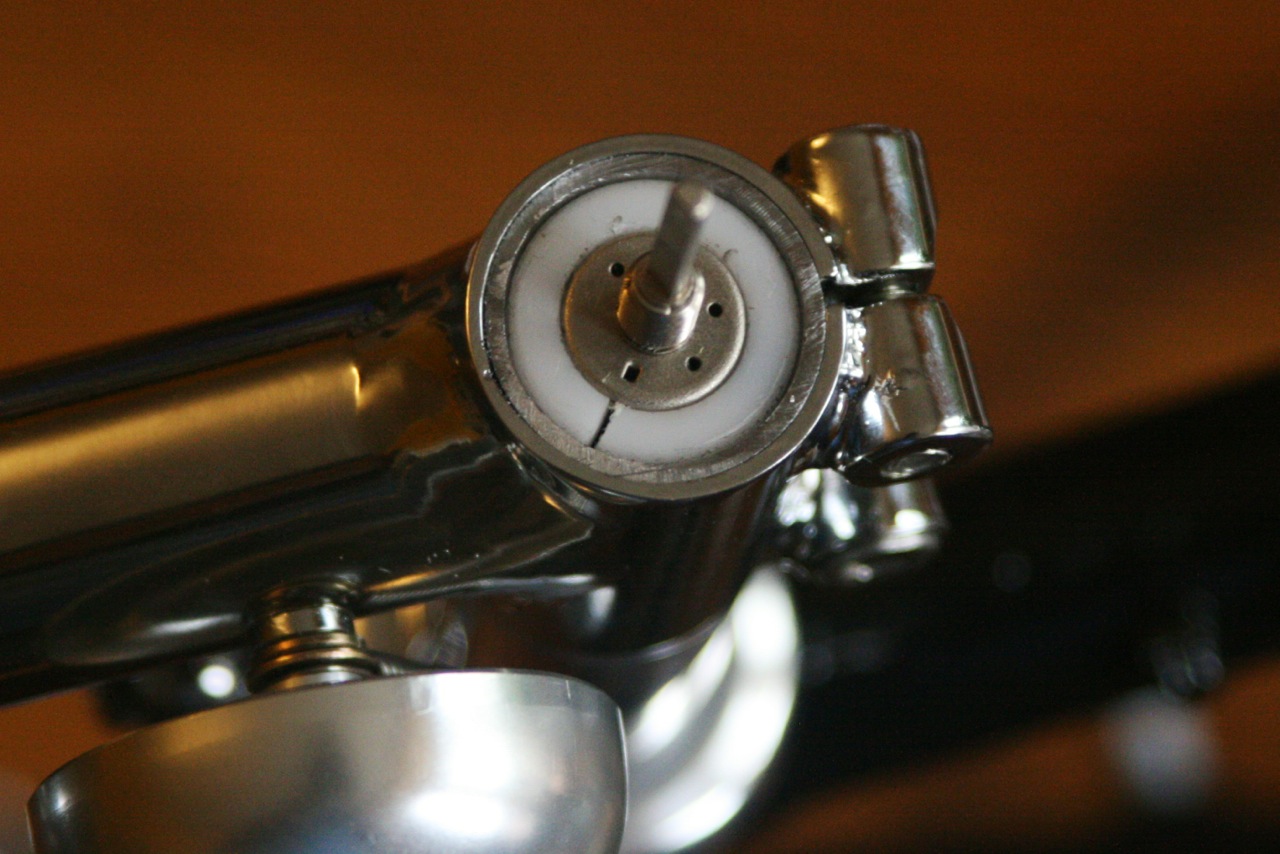
The switch has six positions, which I've set up for off-on-off-on-off-on. Here is one of the three "on" positions.

And here is proof that it all works.

22 comments:
Wow. That's a beautiful bicycle.
Very very nice....some great details here. The Mafac brakes on the bosses are just what I want to do on my next build - did you make yours or buy them like I did? Thanks for sharing,
fc
Thank you and Thank you! I bought the bosses -- they're very similar to the ones you can now get from Compass. (They're from a guy in Israel named Amir.)
This is (again) one top-notch build. I've been following both your work and Oliver's work captured on blogger. I appreciate the detail in the pictures although I was unsure if that was a chain slap device or a spoke holder on the drive side chain stay?
Did you use similar geometry to Greg Curnoe bike? The proportions look so very classic! I wish I rode a larger frame.
Thanks, Ian!
That's a chain slap protector, MADE from a spoke :) I stole this idea from Alex Singer, and Olivier implemented it.
The geometry is absolutely identical to the Curnoe bike. I actually used to hate the look of tall frames like these, but now I'm really in to it. (This bike could have been a few cms taller, but this is literally as big a frame as you can make from the Large Reynolds 531 tube set.)
Another fantastic bike and build. I just took delivery of a 61cm Ebisu road model by Hiroshi Iimura at Jitensha Studio. I'm with you with respect to frame sizes; I've come to love the look of a taller frame.
I'm also really appreciate your aesthetic sense. You seem to have a knack for choosing great details such as decals and logotypes.
Ron
Thanks, Ron! I really like those Ebisu frame. What colour is yours?
Adam,
The colour is a rich, non-metallic, orangey-red. It could properly be called "vermillion".
I'll send you photos of the bike if you're interested. I really need to take some good shots anyway (before it gets terribly dirty through use).
Ron
Fantastique! I'm so pleased that you - the two you - were able to finish this wonderful project and bicycle. I just love what you've done, how you named it, and how you've presented it here. I am so wistful, just thinking of that bicycle. Bravo!
That's beautiful, Adam--great work. I've been following your builds since the original Nigel and I think this is the best so far.
I understand the appeal of "fully integrated" rando-style bikes but aesthetically they often feel too busy for me, especially if the builder has gone over the top with lugs, paint job, racks, etc. Maybe it's because my sense of aesthetics was developed with the stripped-down simplicity of fixed gear bicycles. Marcel does a good job of integrating these functional elements but maintaining a sense of clean lines and aesthetic subtlety. The black frame and minimal logos are nice (I love the "bis" brand!) and the black highlights in the components--the rear derailleur, the handlebar, the rings on the headlight--do a really great job of tying the whole thing together. Bravo.
Thanks, Chris! And sorry for the wistfulness, too. Working on this bike in the past few weeks has made me really nostalgic for the days in the shop, and really determined to find a way to do more building...
And thanks, Jeremy! I totally agree about the busy-ness, and it was absolutely a goal of mine to keep things as simple as possible. Black and white/silver are pretty easy colours to work with -- they're probably the most common colours on bike parts, and they look really nice together. I generally think black parts look awful on bikes, but when the bike itself is all black or silver, they look pretty cool. The only other colours I needed were brown (sidewalls, Reynolds decal, Brooks saddle fringe--bartape to match) and red (rear light, reflector, non-drive cup on the SKF BB). A really limited colour palette gives it a much less busy look.
Sort of the exact opposite of the Curnoe bike, really :)
And Ron, I'd love to see that colour. Is it like this one from way back when on the VO blog?
Alan,
It looks like the colour shown in that blog posting is called "Molteni Orange". And while it's a very nice colour, it is more of a middle-of-the-road orange.
The colour of my Ebisu looks as if you took a true red and added a bit of yellow-orange to it... if that makes any sense.
Ron
Your best work. Curious as to the tire size you choose, and why you didn't go 650b, which now seems de riguer.
Thanks! I wouldn't, on principle, want to be too de rigeur, of course. Also, I've never ridden 650B, so I don't know what they're like -- but I have ridden 700x30, and I love it. And even with fat tires, I find 650B just looks weird on tall frames. For some reason, I'm just not that interested in 650B... (Although I do have some gorgeous Mavic 650B rims in my closet, collecting dust...)
Alan,
Here is the Ebisu (poor photos, I'm afraid).
http://www.flickr.com/photos/visiondrawn/8212175397/
http://www.flickr.com/photos/visiondrawn/8212192895/
Still, Marcel is in a league of his own.
Cheers,
Ron
Grand Bois 700 x 30 tires?
wow! Stunning build I must say. After last checking your blog in June, it's a pleasant surprise to return today to see Marcel complete. I would love to see some of your builds in person! Being fairly new to cycling, it would be great to see such workmanship in person.
- Cory
Bravo!!!
I know what it takes to do this as i recently completed my rando bike, complete with a 3D printed rear light... have a look here:
http://www.w3schools.com/html/tryit.asp?filename=tryhtml_basic_link
Ron: I absolutely love the colour of your Ebisu. I thinking of something a bit like that for my hypothetical next bike.
Yes, they're 700x30 Grand Bois tires.
Thanks for your comments, Cory! Hmm, yes, perhaps I could arrange some sort of "public viewing" of my bikes some time. I gave a talk at the AGO in November about the Curnoe bike, but that way a pay event. Maybe something at Hoopdriver...
Thanks, Shu-Sin! I'd love to see your bike and 3D printed taillight -- but your link didn't work!
oh, sorry. I was trying to embed the link and pasted the wrong thing... here it is... hope you like:
http://www.flickr.com/photos/15782558@N07/sets/72157632135165870/
Hey Adam,
Came to your blog through my research about framebuilding classes, and the Doug Fattic offering. Been reading many of your other postings, which has been enjoyable and informative.
If you do decide to have a bike meet-and-greet, that would be awesome. Your rides have a lot of character, and it would be great to see them in the flesh.
Cheers,
Kieran
Post a Comment