Friday, May 28, 2010

Fork is Finished

Well, this is an achievement: the first bicycle element completed in the shop!

There is little to explain from today. I cleaned the inside of the crown (with my Dremel knock-off), fluxed everything, and set it up in Olivier's very nice fork jig. Then I put the whole thing vertically into the vise.


I brazed the joint complete in the fixture. For the front triangle, I'll only tack in the fixture, then align on the surface plate, then complete the joint in the vise. Since I don't have much of an alignment system for forks, I figured I would just braze it where it's straight—in the jig—and hope it came out straight.


The good news is that it was indeed pretty straight. And my filing of the Mafac bosses to provide clearance for the fork tang worked well, and I think it's pretty neat how that all came together.

But as the keen-eyed will have already noticed, I brazed the fork crown in backwards. I had filed the flat off the "front" of the crown but left this flat on the "back," since I was going to pass a generator wire through the hole. Well, you don't really need flats for generator wires anyway. This was the gods' way of telling me it would look better if I filed both front and back smooth. I realized the crown was backward as soon as I finished one side, so I filled the hole with silver, and when everything had cooled I filed it smooth. It now looks like this:


The Mafacs seem to sit pretty well on the completed fork—they'll just need a bit of filing/cold setting to have perfectly smooth motion. I'm pretty pleased with how that worked out.

I'm also happy with my shorelines, which came out very nice:


Most of all, I'm happy to have completed something! Thanks to Amir Avitzur for the Mafac bosses, to John Clay for the beautifully raked blades, and to Kirk Pacenti for the excellent Mitsugi crown.

Thursday, May 27, 2010

More Fork

Lots more incremental progress in the shop this week. Famebuilding is a very low-speed activity when you're as picky as I am. But I'm pretty happy with how things are turning out.

The first step this week was trimming the blades so that the wheel sits both exactly half-way between the two blades and gives the correct wheel clearance underneath the crown. This was an important but non-photogenic process, involving many calculations and much careful hacksawing. Eventually I got everything right.

Normally the next step would be to braze the blades into the fork crown and complete the fork. But I'm using brazed-on Mafac bosses on this bike. Since these bosses are much higher-up on the fork blade than cantilevers, and since I want to fillet-braze them in place with brass, I thought I ought to attach them before doing the blades/crown. If I were to brass-braze the bosses after silver-brazing the crown, the heat would draw silver out of the crown.

So I proceeded to brazing on the Mafac bosses. The whole thing was a very inexact process. The miter was tricky to get, for one thing, since the fork blade is oval and its radius is always changing. Then you need to have the bosses end up between 60 and 64mm apart for the Mafacs. It took a lot of fiddling, and eventually I settled for pretty loose miters. But I thought the brass would fill them.

Here are the bosses jigged in a rack tang (another element of inexactness!):


Unfortunately the first try was a total failure. I tacked the bosses in two spots each, but when I let everything cool and unscrewed the bosses from the jig, the screws only turned a few times and then stuck in place. I torqued one screw so hard that the tack broke. On the other side, the bolt broke off in the boss. I heated up the boss on that side and un-tacked it. I figure what happened was that things got very hot inside the boss and the screws oxidized and wouldn't come loose. I'm sure I didn't get brass on the threads, because they did loosen a few turns.

Anyway, I had to do everything over again, including the tricky miter. This time I used much shorter bolts (indeed, I used the same bolts, as they snapped off, with three threads or so left) and greased them. When I tacked them this time, there was a nice little grease fire on each bolt, but they unscrewed just fine. Then I fillet-brazed them properly. They came out looking like this before filing:


And with some filing, like this:


I then stuck the blades in the fork crown to see if the bosses were more or less lined up. They were. I won't know for sure until the blades are properly brazed in to the crown, but it definitely seems like things will be fine. (The crown is backwards here; the photo below shows the proper, smooth-sided orientation).


The pads even ended up in the right place!


Originally I had planned on brazing little tubes on each of the bosses to act as spring retainers. But I mitered the bosses so deeply that there isn't really room for this anyway. And the little tab-retainers that came with the bosses are actually very nice. I'll just use them:


Interspersed with all this Mafac stuff has been lots of dropout filing. My "slotless" method is definitely a gigantic headache in terms of filing. Without eyelets it would be fine; with eyelets it's endless. This would be a totally impractical method for a production shop. But for me, it's more good practice. Here is how things look so far:


And here is a shot that shows what a long process this has been. I taped this drawing of my fork to the workbench last week when I was trying to figure out where to trim the blades. It is now very tattered, and covered with the aforementioned calculations. But it does show that I was able to successfully do what I intended.


I would have finished the fork today, but the inside of the fork crown is very dirty, and unfortunately inaccessible with emery cloth. I'll need to get Olivier to sandblast it or else dunk it in acid.

Otherwise, the next step is brazing the front triangle! Things are coming along.

Sunday, May 23, 2010

Riding in Niagara

I've spent the past few days visiting my mother in Fenwick, Ontario and have spent a lot of time riding. The roads are beautiful around here: a great mix of flat farmland and the occasional surprising hill. I was riding the incredible dirt roads around Goodwood earlier in the week, but Niagara certainly gives that area a run for its money. Here are some photos:


This weekend also happened to be the running of the Niagara Classic—a well-known local race, which runs a few kilometers north of my mother's house. I went and previewed the course last night. The famous Saylor's Hill is steep. The Senior 1 men had to climb it ten times today. Once up there on Niles (my fixed gear) was sufficient to wear me out.

Here's a shot of the hill (Niles is visible in the bottom right):


And here is the lead group on the first lap:


The next time I come I'll leave my fixed gear at home and have a bit more fun on these climbs and descents...

Friday, May 21, 2010

Fork Progress

My lack of taps/facers for my bottom bracket combined with my lack of a steer tube to keep me out of the shop for some time. But the arrival of both has resulted in all sorts of action in the last two days.

We got "Xpert" (aka IceToolz—thank heavens they're not sold under that name in Canada) taps/facers. After one tapping and one facing, they seem like a great deal. The kit includes English and Italian taps, and the facer uses a Campagnolo-style spring system. There is some gratiutous carbon tape on the handles, but there's nothing else to complain about. They even come in a nice hard-shell plastic case.

After facing my BB shell I cold set the seat tube into alignment—it was off by a few thousandths of an inch. I can't do much more until yet another tools materializes: a head tube alignment system. Olivier is working on it.

Next, the fork. For a while I've been thinking about the best way of getting a fender attachment point under the fork crown. The nicest I've seen is this one by Peter Weigle, though I couldn't quite figure out he did it (and don't particularly like the way that the steerer isn't brazed all the way in to the crown. I worked out something I could understand a bit better. I took a piece of steel sheet and fillet-brazed it to the bottom (here represented as the top) of the steer tube. Then I filed it flush with the steerer. It ended up looking like this:


Then I drilled a bunch of holes. (Keep in mind that I did all this without a lathe—and actually without even using a ruler. Which is why things are not perfectly aligned.) First I drilled a hole for a water bottle boss and brass-brazed it in place. Then I drilled holes on the "right" and "left," both of which are angled in. These are for passing wires: one for the generator-to-switch wire, and one for the switch-to-headlight. Then I drilled drain holes at the front and the rear. Then I drilled four more small holes, for fun. It came out looking like this:


You'll notice that the water bottle boss is not flush with the bottom of the steer tube like in Peter Weigle's. I left it like this so that there would be room for all the cables to enter/exit the steerer. I left a extra few milimeters in the front wheel clearance to compensate.

The next step was brazing all this in to the fork crown. That went well, though I didn't get all those holes perfectly aligned. It's hard to see when things are covered in flux!


Here is a look at the nice silver penetration (and the gorgeous Pacenti Mitsugi crown, filed into my shape):


And here is everything all is place. I think it looks pretty nice—and of course will be functionally very good too.


I kept my roll going and brazed the dropouts to the fork blades. I did these "slotless," as I did my rear dropouts. With the rake more or less matching my drawing, and with the blades cut to the same length, I stuck everything in Olivier's lovely fork jig. It all seemed to fit together, so I tacked each of the dropouts in two places. (Note the presence of an Arizona iced tea in this moody photo. I accomplish nothing in this world without one by my side.)


Then I took everything out of the jig, put the steerer in a tube block, the dropouts in an axle spaced at 100mm, and fitted it all together.


Using this slotless method has advantages and disadvantages. On the upside, everything is "literal": you don't need to slot the dropouts at any particular slight angle, or really worry about fixturing at all: you just hold it in a fake axle and everything ends up at the right angle. On the downside: there's a lot of cleanup work (filing), and with eyelets things are tricky. I was also a bit worried that it would come out really crooked.

Thankfully it didn't. Here's the wheel held provisionally in place, more or less centred:


I still need to file the dropouts, shorten the blades by a centimetre, and braze them to the crown. But this is more or less what it will look like—though will have a bit less clearance, and a lot less steer tube. The rake on the blades is really nice—thanks to John Clay.


I'll get the fork finished up and hopefully tack and braze the front triangle next week.

Saturday, May 15, 2010

Adam Jr.'s Rear Wheel

I apologize for the lack of posts this week! Without bottom bracket taps/facers I can't do very much. I've been doing a bit of fiddling with my fork, but nothing exciting just yet. But the fun will start Tuesday, when the taps/facer should arrive.

In the meantime, I've built up a rear wheel for Adam Jr. (the bike currently in progress; a randonneur.) A few years ago I built up a nice randonneur wheelset: Mavic MA (identical to MA2, but with single eyelets) 32-hole rims front and rear, with a SON28 in the front and a Phil Wood "Riv" freewheel hub in the rear. I have now un-built both of these wheels. I swapped the SON28 for a SON20R when it came out. And, given my recent obsession with 6-speed Uniglide (and my acquisition of no fewer than fifteen NOS 13-24 cassettes) I decided to switch from the Phil hub to a Shimano Deore XT M730 hub from 1987.

I did this because:
  • the Phil hub was 135mm, and that started to seem like a problem given my desire for low Q-factor
  • the Phil hub is set up for 7-speed, and by going with 6-speed (even better than 7-speed for friction shifting) I won back much of the dish that 130 vs. 135mm had lost me
  • Uniglide freewheels are hard to find
  • cassettes let you easily create custom ratios, and Uniglide cassette cogs are reversible for double the wear life
  • the XT plus cassette is a bit lighter
The Phil hub is certainly gorgeous—but I actually think I like the way the M730 looks better. Like the Phil, it's not anodized, and polishes up very nicely.


Also, I'd recently come across some nice 36-hole MA2 rims. For a rear wheel, those double eyelets are nice. And for a randonneur wheel, why not add a few extra spokes? The Deore XT is drilled for 36, and so I now have a 36-hole double-eyeletted MA2 rear matched with a 32-hole single-eyeletted MA front. It's a pretty sensible arrangement.

The problem? Decals. 


On top is one of my 32H MA rims. It has the "Mountain" Mavic logo, which I consider very cool, although maybe isn't the best fit for a "classy" randonneur without any yellow or green in the colour scheme. Below it is one of my 36H MA2s. I really don't like that decal. In its attempt to be "modern" and "fun" it just ends up looking silly and awkward. 

Since I liked the rims but didn't like the decal, I decided to remove it—and replace it with a reproduction of an old (1970s)-style Mavic MA2 decal. (I got these on eBay.) The rim on the bottom is one of my MA2s with the decal removed and replaced. Here's another look:


That's a gorgeous decal!  I'm going to replace the "Mountain" logo on the front MA rim with one also (no "MA" decals were available; so it won't be entirely accurate.) 

Now that it's built, this rear wheel will follow me in to the shop, where it will be used to make sure everything fits as it's supposed to...

Friday, May 7, 2010

Moving a Derailleur Tab, Etc.

Now that I have finished my seat tube/bottom bracket, I need to tap and face the BB before proceeding to the next step. Except that I not have taps or facers—so I've ordered them, and things will proceed next week.

In the meantime, I thought I would move the tab on my Campagnolo horizontal dropouts, for Bike #3. As mentioned in a previous post, I'm doing this because I'm going to be using a Huret Jubilee derailleur and want to minimize chain gap.

Here is the dropout:


Here is the dropout with its tab cut off:


After this I filed the "recipient" area flat. Then I put the dropout and detached tab into a very crude fixture. I used a big C-clamp, with the surface touching the machined faces of both the dropout and the hanger tab, so that they would be in line. The C-clamp was a massive heat sink, but I just focused my flame on one small area and added a spot of brass.


Then I tacked the front of the tab. This time I used the C-clamp to keep the tab pressed up against the dropout. Here it is with both tacks:


With the tab tacked in place, I removed the heat-sinking C-clamp and brazed it together properly. It came out looking like this. It will file up nicely!


And here it is with the derailleur in place. (I tested it in a wheel, and yes, placing the axle all the way forward does drastically reduce chain gap—though I'll be lucky to get the derailleur to shift on to a 22-tooth large cog. Not a problem, really, since I'm planning on using something like a 13-21.)


I also did a few other things in the shop. I checked my TT miters for the thousandth time, and while there are still little gaps, I think all will be well. Here's a look at the head tube with the lugs in place:


I also trimmed the fork blades and started working on the dropouts. With roughly the right amount of rake in place, the next step is to stick everything in the fork jig and make sure it all fits together.


There's not too much to do until the taps and facer arrive in the mail. But I'm sure I'll manage to stay busy...

Tuesday, May 4, 2010

Seat Tube to Bottom Bracket

The second time was the charm, I'm happy to report.

I was extremely careful about two things this time. Firstly, cleanliness of the joint. I sanded the joint with 80 grit shop cloth, then cleaned it out several times with methyl alcohol on a J-Cloth. I cleaned not just the surface of the joint itself but also the adjoining areas. I did the same to the tube, inside and out. Secondly, flux. I put it everywhere. On the tube, in the shell, inside the tube, on top of the shell.

(I didn't take any in-progress photos because I wanted no distractions of any kind!)

When it came time to braze the joint, I did a much slower preheat. I heated up the bottom of the shell first, then heated the tube well above the joint, then melted the flux, then slowly heated up my first quarter-section. This was the "trouble spot" from last time: the large area between the chainstays. Once everything was up to heat, the silver flowed extremely easily. As you can see in the photo above, this time I got it right: full penetration all the way around.

(I forgot to mention in my post about reaming out my stranded tube that, except for the area where no silver flowed, the silver was perfectly even everywhere else. I've heard that silver can be a bit uneven—that you can think you got silver everywhere since it flowed from top to bottom, but in fact there are gaps in between. That wasn't the case last time, and I'm sure it was as even this time.)


I was a little less successful with my shorelines. They're a bit bubbly, and there is one miniscule gap on the non-driveside. But really, it's very good, and this isn't an area where I demand absolute perfection. If it was one of the headlugs or the seatlug, I'd go in and add some more silver and make the shorelines perfect. In this case, I'll leave it! (I do need to work on my tacking, however. I always cause a mess in that step. I have a fair amount of silver to file off the top of the lug...)

So "Adam Jr." is underway! I'm excited for the next step—cleaning up this joint, tapping and facing the shell, and then I guess tacking the rest of the front triangle...

Sunday, May 2, 2010

Parts

Part of being a good "constructeur," I should think, is always thinking about which parts to use before your bike has been built. So without yet mentioning the overall "theme" of Bike #3, here are some of its parts, and the thought behind them.

Cranks

This will be a race bike, so I wanted something like a 52-40 gearing. Since one of the objectives of the bike is to make it as light as reasonably possible, I naturally wanted to use TA Pro 5 Vis cranks. I found the above crankset on eBay France for a very good price. It was configured as a 52-40-32 triple. One of the many nice things about the TA cranks is that the same arms can be used in a single, double, triple, quadruple, etc. I'm going to keep the 32 as a spare for my 48-32 randonneur gearing and run this as a double. These cranks came to me with a pretty dull finish, but a few minutes with Simichrome and they were shining like new.

Also photographed, since they're also polished aluminum, as the Huret Jubilee derailleur that will be used on this bike, and the Shimano Deore DX hub I polished.

Wheels

This wheelset presents possibly the first ever combined use of Mavic SSC tubular rims and Deore DX hubs. They're nice hubs, which I have fanatically polished, and everything looks nice together. 32 hole, 130-spaced, with a freehub body that accepts 6- or 7-speed, Hyperglide or Uniglide cassettes. I used 2.0/1.8 double-butted spokes on the driveside and 1.8/1.6 on the non-driveside. I just kept tensioning and tensioning and the rims wouldn't go out of true; this will be a strong wheelset! The front wheel will be laced radially, which will be fun! Challenge Paris-Roubaix or Veloflex Roubaix tubulars to be added.

Saddle

I've been experimenting this season riding a Selle Italia Flite. Last year, during the 100km "Hell of the North" race, I was surprised to find my Flite was very comfortable. Since it's half the weight of a Brooks Pro, can be set back much further on the seatpost, and is nice and long for a variety of positions, I thought I would see if it was as comfortable on long rides. On the couple of 160km rides I've done this year, it seems to be only slightly less comfortable than the Brooks. Since I saw that Selle Italia had recently reissued what they call the "1990 Flite," I bought two from All Terrain Cycles in the UK. At $70 Canadian each, this was a serious bargain compared to a Titanium-railed Brooks Pro, for example.

The Flite came in several slightly different colour/logo configurations, but the reissue has the original red/white/yellow setup, which is probably the nicest.

Front Derailleur

Even though Olivier's rod-operated front derailleur remains the nicest one I've seen, there is still a place for lever-operated ones! With a 52/40, I'll want to be making front changes often enough, so I'll use a regular derailleur. Olivier and I have talked about why builders use brazed-on derailleur tabs, and we can't figure it out. I once saw a Mariposa frame whose seat tube had cracked at the derailleur tab; it's on the thinnest butt on the bike, and seems a perfect spot for a stress riser. I've never had a clamp-on FD come loose, so that doesn't seem like a good reason for picking a braze-on. The worst reason of all is weight: the Dura Ace 7700 clamp-on weighs 6 grams more than the braze-on version. The actual steel braze on weights at least that much, and probably more.

So, what is the nicest clamp-on 28.6 front derailleur out there? The aforementioned Dura Ace 7700, I think, followed closely by the 7410. With the dominance of carbon frames, it's tricky to find 28.6 clamp-on FDs these days. But apparently the French, so wise in other bike matters, have more than enough 7700 and 7410 FD on their hands, and just want to get rid of them. Olivier and I have been snapping up several very cheap, new in box Dura Ace FDs over the last couple of weeks, for an average cost of around $25. Some of the booty:


Brake Lever Hoods

For reasons I will disclose in a future post, I want to use clear hoods for Bike #3. I had no idea such things existed—but they do, and they're incredible! Behold:


These might not be for everyone, but for me, they're about as good as it gets. They're Modolo 919 Anatomic hoods (my favourite!) through which are visible the lovely insides of these Super Record brake levers.


These levers came to me somewhat beat up on a used bike I bought some time ago. They had Shimano clamp bands on them, which just seemed wrong, so I swapped these in from a pair of Triomphe levers. If only I had clear bar tape, and could actually see these!
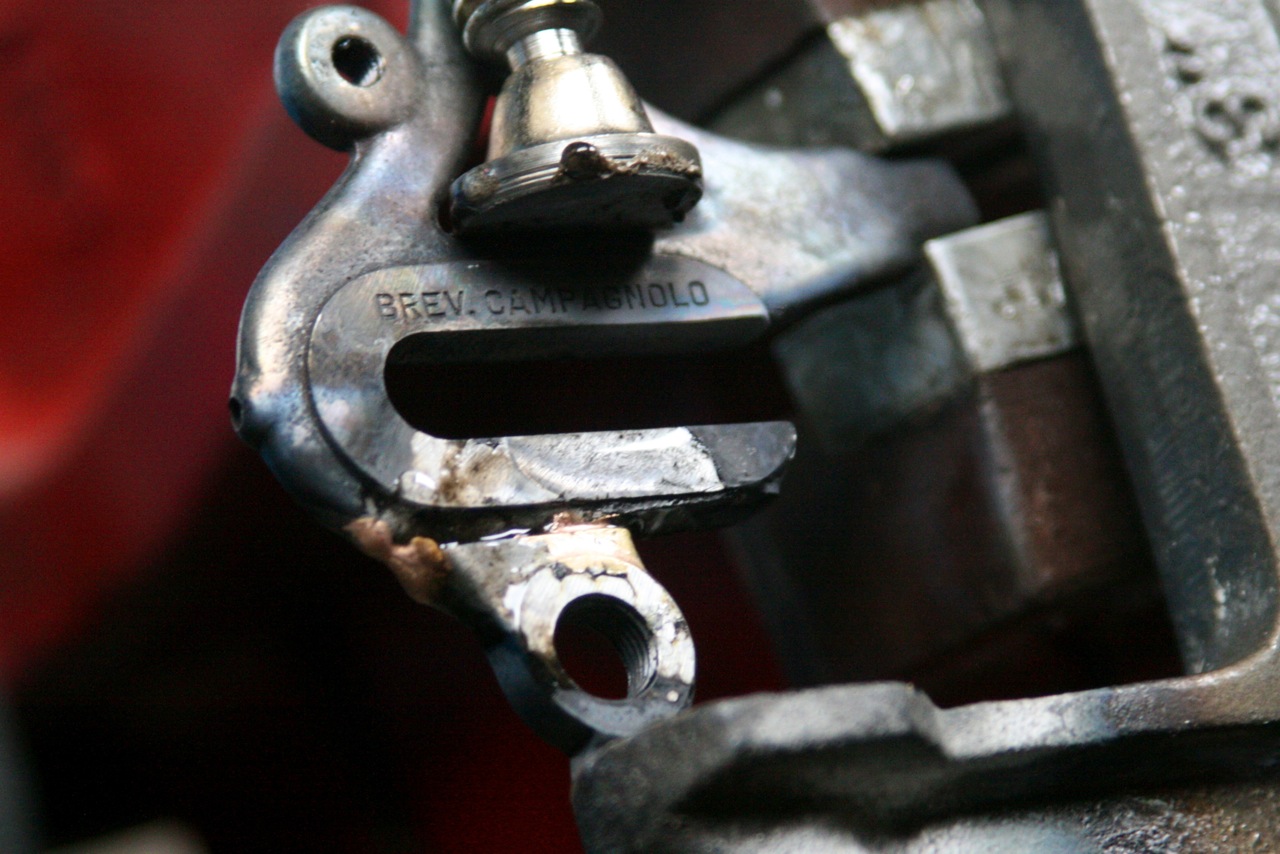

Dropouts

Finally, more a frame part than a part-part, but worthy of mention here anyway. Since I'm using a Huret Jubilee, and since I want it to actually shift well and not just be phenomenally light, I have to be careful about my dropout choice. First issue: do I need to use a special Huret dropout, with its unusual hanger tab? No: thankfully, my Jubilee is made for normal Campagnolo tabs. Second issue: how to minimize chain gap by getting the upper pivot considerably behind the axle? I think what I will do is use the above Campagnolo 1010 long horizontal dropout, but actually cut off the tab and move it to the centre of the dropout. (Why did they place the tab all the way at the front, anyway? It only allows adjusting in one direction!)

So this week I promise posts on my second attempt at brazing the ST/BB, and also a post on Bike #3, which I may as well reveal right now will be named Greg Curnoe.