I brought Greg Curnoe Bike home from the shop for Christmas—a time of year, after all, when you want to be near your loved ones. He is still not finished: he needs brake cable stops on the top tube and a derailleur stop on the driveside chainstay (they've been in the mail for a month) and there's lots of lug filing to be done. But I decided to dress him up for Christmas anyway.
Not all of this is as it will actually be on the finished bike, of course. You can mentally subtract about 10cm from the handlebar height, for example (much trimming of the steerer is needed!) and since I didn't have enough hands to carry home the actual front wheel, that's a totally incorrect Sante/CR18/Pasela 35 front wheel deflated to approximately the proper diameter. The fenders are also not installed. But everything else is pretty much as it will be—and I'm happy to say it all looks very good and fits properly.

I believe I've already made it quite clear how I feel about the seat cluster area. This shot reveals the full complexity around the binder. This began as an old hollow, stamped binder that I then reinforced, filling the usual bevelled spot in the centre with a big brass fillet, and then brazing the mitered stays both to the actual steel and to the brass. The seatpost (a nice Sugino Super Mighty) is not the one I'll use—the flutes are too long. I forgot the Nuovo Record post I'll use at the shop. (Though painted flutes would look really nice! Hmm....)
From the proper Curnoe non-driveside. The seat lug looks even nicer with a seatpost installed! There's still some filing to be done on this lug, but it's getting pretty good.
Some filing needed here too, but again, pretty much right. There's a little imperfection in the lug itself there that will need some Bondo. Though not the easiest to work with, these Cinelli CS stamped lugs are about as nice as lugs get.
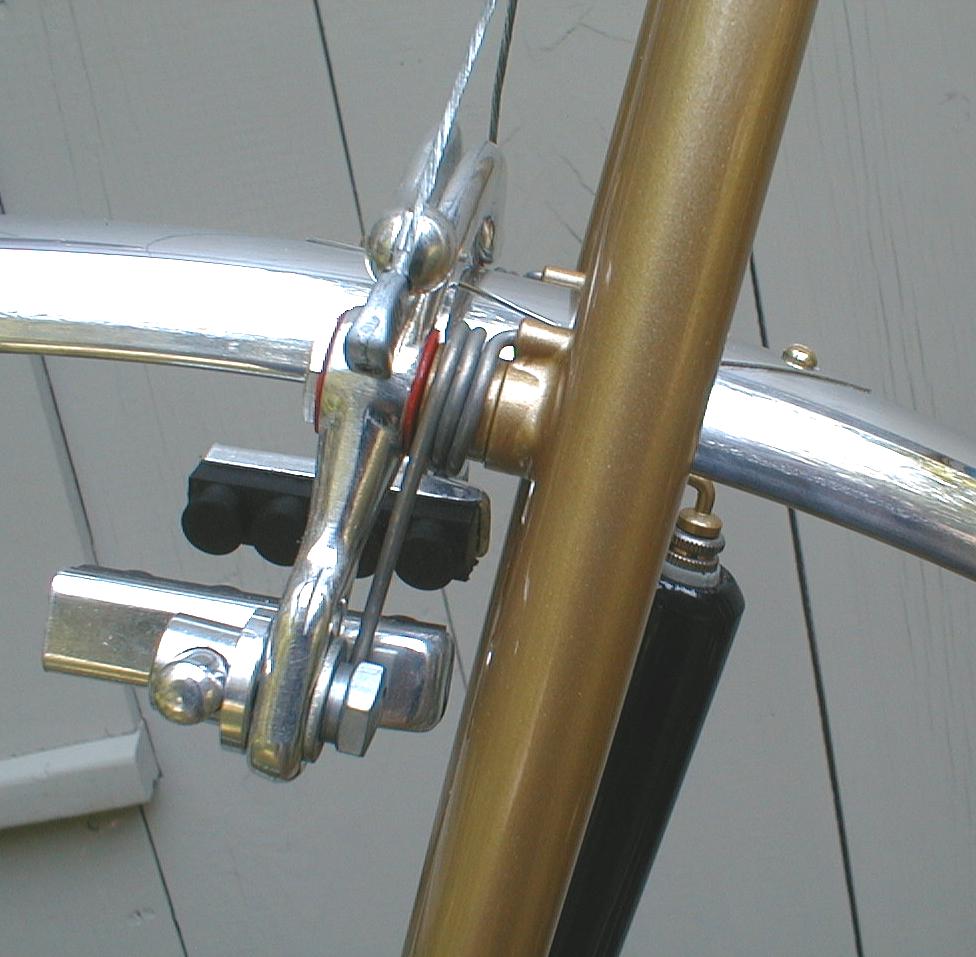
From the other side. I just can't get enough of the Richard Sachs Newvex crowns. I love the way the chevrons look on top of flat crowns; in fact, all three of my bikes have them!
Good measurements and clearances all around in the BB area: the BB height is 10.5", which is what I wanted; the chainrings will be in the right place once I've tightened the BB (a 116mm JIS SKF); there's good clearance between the crank arm and stay; and there is 12mm between the tire and the CS bridge for good fender lines. It's also possible to insert a fully inflated wheel into the horizontal drops, with the fender installed. How, you may ask?
Well, I filed the bottom of the dropout so that they are the exact minimum size to provide maximum contact with the skewer faces with the wheel in the desired position.
While I'm on this subject, I will note that Campagnolo 1010 dropouts, with adjuster screws set to maximum length, look like the tonguey mouths of heraldic bears:
(Of course the toothed Cambio Corsa dropouts are even closer.) In any case...
There's lots of clearance for a bolt inside the eyelet, too, so I can use draw bolts for the fender stays on both sides. That's a 6-speed Uniglide cassette on a 7-speed freehub body. (I think I'll switch the 13-21 to a 13-24.)
Clearance at the seatstay bridge is also 12mm, which is just what I wanted. This was not always the case, however! I'm not sure how, exactly, but on my first attempt, I put it 8mm from the tire. I think what happened was that I brazed it in place without a dummy axle in the rear drops, and the spacing must have been < 130mm. It was actually pretty fun to un-braze, remiter, and re-braze the bridge. You have a lot of power with a torch, some files, and an unpainted frame!
You'll also notice in this pictures that I've brazed on spring retainers for the Mafac brakes. This is another story of a mistake. I was laying on my couch one day last week watching an episode of Curb Your Enthusiasm when it suddenly struck me that I had put all my Mafac bosses on backwards. I'm not sure what prompted the memory, or how I was so sure, but I suddenly knew what I'd done.
Like the ones used on this Mariposa, my Mafac bosses are designed to be used with a little aluminum plate that serves as a spring retainer:
For these to work properly, the flat needs to be aligned on the inside of the stay/fork blade. Otherwise, the sprint hole ends up in the wrong place and the spring ends up with too little tension. My bosses, of course, were all aligned to the outside, which put the spring retainers in precisely the wrong direction. (Hey, you know what? This Mariposa appears to have its bosses on bakwards too! That spring it as 11 o'clock, and it's supposed to be at 1 o'clock! So maybe I would have been fine after all!)
Once I'd discovered this, my options were either to completely un-braze and flip all the bosses, which I really didn't want to do—or to braze on spring retainers. Obviously I chose the latter option. And actually, I was happy to have the opportunity, since I'd found a little problem with the way I brazed my spring retainers on to the Jocelyn Lovell Bike.
This is hard to explain in words, but I'll try. The bosses I bought from Amir consist of three "steps": the tip is the surface on which the brake arms turn; then there is a larger-diameter area where the springs sit, with the aluminum spring retainer plate sandwiched in there; and then finally the largest-diameter area, which you miter to the stay. On the Jocelyn Lovell bike, I had brazed the spring retainers on to the largest-diameter area, and made them align with the edge of this area with the spring area.
However, the bosses are designed to accomodate the depth of the 2mm aluminum plate. So in effect my spring retainers were 2mm too far "back," and as a result the spring had too much room to sit in, and sort of flopped around. I don't have a picture of this on the JL bike, but you can see that Peter Weigle did the same thing here:
Obviously, if Peter Weigle is doing it, it's probably okay. But notice how the spring is nicely sandwiched on the Mariposa with the 2mm aluminum spring retainer, but not at all here. I wanted that sandwiching! (It might actually affect the may the brake works. I think the spring is supposed to push against the brake arm as a way of securing it against the brake bolt. But I don't know.)
So what I did was cut four little rings, 2mm in depth and 12mm in ID to match the diameter of that part of the Mafac boss. Luckily the ID of a piece of 14mm seatstay is 12mm, and we had some scraps laying around. Cutting these things with a hacksaw to a consistent width of 2mm was beyond my ability, but it didn't need to be exact. I brazed a tube on to these rings. They came out looking a bit like
rings, didn't they?
I slid these on to the bosses, being very careful to get the spring-retaining tube to line up at exactly the right spot for proper spring tension (I used the crescent from my Mafac Competitions as a guide for this), and then brazed the ring to the boss and fillet-brazed the tube to the back of the boss.
It was
not an easy brazing operation, since the bosses are pretty massive and the tubes absolutely tiny. Also, building fillets with 56% silver is not merely difficult but stupid. I should have used 45%. Anyway, after a nightmarish amount of work, I had my brazed-on spring retainers, which provided the desired sandwiching effect.
And, really, is there anything cooler than a Mafac brake with brazed-on bosses? I really don't think so. (I find something especially beautiful in the way the brake arms align with the top of the crown here.)
I leave you with a Christmassy image from the shop. There is my fork in the vise; if you look closely, you can see the forward fender stay installed. It was a particularly cold day, and the upper window was completely frosted over.
Merry Christmas and Happy Holidays!


4 comments:
The addition of the small tubes on the Mafac bosses looks great. I have another set of Amir's bosses that are waiting to be built up so I may do the same thing you did. Where did you find the small tubing? And I also like the very clean "brake bridge" that is really just a fender boss...what size OD tubing did you use, and where did you source it? Looking forward to seeing the frame back from paint!
frank c
Thanks! The answer to most of these questions is: my shopmate Olivier. He orders all kinds of tubing, I chip in, and I help myself :) I can't recall the exact OD of the spring retainer tube (Olivier might, though), and our shop is closed for the next two weeks -- and the bike itself is out for paint -- so I won't be able to check for a while. I can tell you that the OD on the "brake bridge" tubing is 3/8".
Thanks for the reply AH. This bike is very similar to a project bike I'm collecting parts for - I've got a box of 531 tubing, TA cranks, Simplex dropouts, Nervex lugs, Mafac Racers, etc. Can I check in with you in a few weeks and see where you sourced the 3/8 tubing and the spring retainer tubes? Thanks much,
frank c
Two weeks early: Olivier presumes the spring retainer tubing is 3/16x0.035". We ordered it from Aircraft Spruce.
Post a Comment